Imagine never typing out the same meeting agenda, project brief, or daily journal entry structure ever again. That's not a pipe dream; it's the reality when you start leveraging Obsidian's core features for template automation. By harnessing the hidden power within your vault, you can transform repetitive note-taking into a streamlined, consistent, and surprisingly enjoyable process. This guide will show you how to move beyond manual entry and build an automated knowledge system that truly works for you.
At a Glance: Your Path to Automated Notes
- Obsidian's Built-in Templates: The simplest starting point for reusable text snippets and basic placeholders.
- Templater Community Plugin: The powerhouse for dynamic, interactive templates that use JavaScript and user input.
- Note Properties (YAML Frontmatter): Structured metadata crucial for organizing, searching, and connecting your notes.
- "Auto Template Trigger" Plugin: A lightweight solution for automatically applying templates to specific folders or prompting you to choose.
- The Big Picture: Combining these tools saves you time, ensures consistency, and unlocks deeper insights from your interconnected knowledge base.
Beyond Manual Entry: Why Automation Matters in Obsidian
For many, Obsidian starts as a simple markdown editor – a clean slate for thoughts. But its true magic unfolds when you move past just typing and begin orchestrating your information. Every time you manually re-create a heading structure, type out a date, or remember to add specific tags, you're losing precious seconds and introducing potential inconsistencies.
The real benefit of template automation isn't just speed; it's about consistency, clarity, and connection. Consistent note structures make your vault easier to navigate, search, and query. Clear, pre-defined sections ensure you capture all necessary information. And by automating the inclusion of metadata and links, you build a powerful, interconnected web of knowledge that reveals insights you might otherwise miss.
Think of it like building a house. You could cut every piece of wood by hand for every beam and stud. Or, you could use pre-fabricated components and power tools to assemble a stronger, more consistent structure in a fraction of the time. Template automation is your power tool for knowledge building.
The Foundation: Obsidian's Built-in Templates Plugin
Every journey into Obsidian automation begins with its native Templates core plugin. It's the simplest way to define reusable text snippets, perfect for basic structures that don't need much dynamic flair.
You'll find it by navigating to Settings > Core plugins and ensuring "Templates" is toggled on. Once active, you'll specify a "Template folder location" – a dedicated folder (e.g., Templates/) where you'll store all your template files.
Your First Step Towards Automation
Let's say you want a consistent header for your daily notes. You'd create a file in your Templates/ folder, perhaps named Daily Note Template.md, and add content like this:
markdown
Daily Note: {{date:YYYY-MM-DD}}
Today's Focus
Accomplishments
Thoughts & Reflections
Notice the {{date:YYYY-MM-DD}}? That's a simple placeholder. When you use the "Insert template" command (via the Command Palette or a hotkey), Obsidian will automatically replace {{date:YYYY-MM-DD}} with the current date, formatted as YYYY-MM-DD. It also understands {{title}} for the new note's name and {{time}} for the current time.
This basic functionality is fantastic for ensuring standard headers, basic checklists, or quick-start sections.
Limitations to Keep in Mind
While a solid start, the core Templates plugin has its limits. It's designed for static text and very simple placeholders. You can't:
- Prompt yourself for input (e.g., "What's the meeting topic?").
- Perform complex date calculations (e.g., next week's date).
- Interact with your vault (e.g., get a list of uncompleted tasks).
- Dynamically rename files based on content or user input.
For that kind of power, you need to bring in the big guns: Templater.
Unlocking True Dynamism: The Templater Community Plugin
If Obsidian's core Templates plugin is a sturdy bicycle, the Templater community plugin is a high-performance motorcycle. It transforms static templates into dynamic, interactive powerhouses, letting you run JavaScript, interact with your vault, and prompt for user input, all from within your template files. This is where real automation truly takes off.
You'll install Templater via Settings > Community plugins > Browse and then activate it. Just like the core Templates plugin, you'll need to designate a "Template folder location" in Templater's settings. It's often best to use the same folder you've set up for your core templates, or a subfolder within it (e.g., Templates/Templater/) to keep things organized.
Why Templater Changes Everything
Templater's strength lies in its ability to execute code. This opens up a world of possibilities:
- Interactive Prompts: Ask for a meeting title, project ID, or attendee list right when you create a new note.
- Dynamic Dates & Times: Calculate future dates, format timestamps, or insert specific date ranges.
- Vault Interaction: Pull information from other notes, create links based on user input, or even perform basic file operations.
- Complex Logic: Use conditional statements to include different sections based on user choices or existing data.
For anyone serious about automating their knowledge flow, Templater is an indispensable tool. It's how you move from merely copying text to truly make an obsidian generator that builds notes tailored to your exact needs on the fly.
Core Concepts: JavaScript, User Input, Vault Interaction
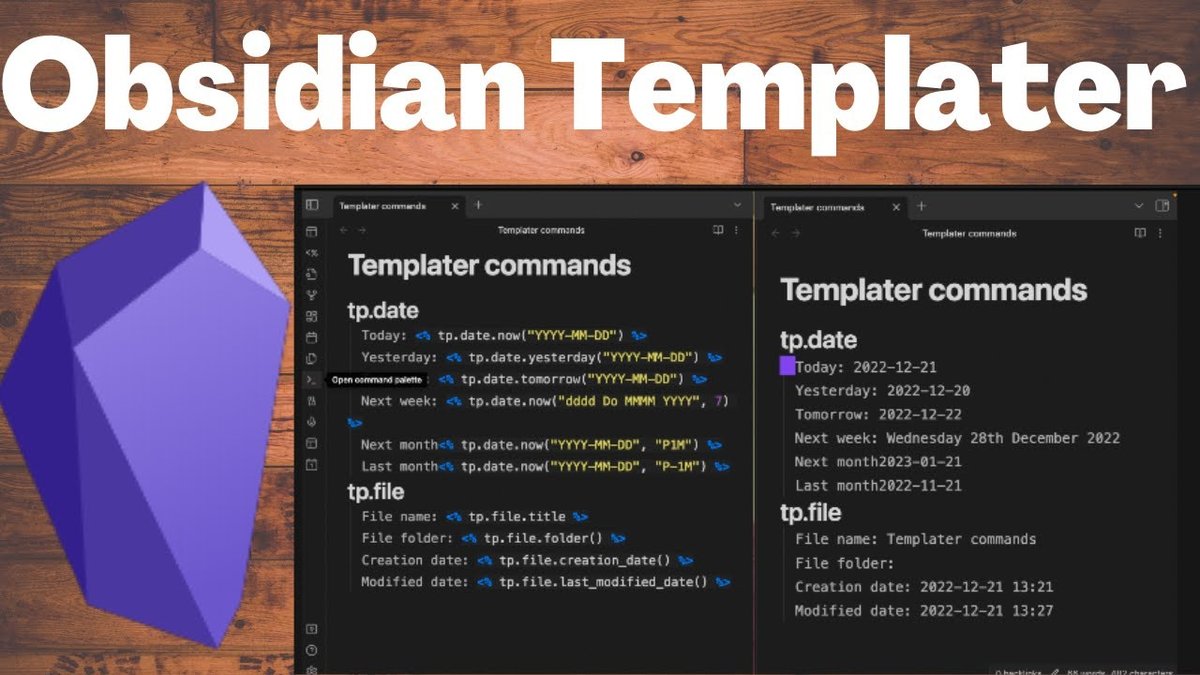
Templater uses a syntax that leverages JavaScript. You'll typically wrap Templater commands in <% ... %> for inline expressions or <%* ... %> for code blocks.
Here are a few common patterns:
- User Input:
markdown
<% tp.system.prompt("Meeting Title") %>
This will pop up a dialog box asking for "Meeting Title" and insert the user's response. - Date Formatting (Advanced):
markdown
Due Date: <% tp.date.now("YYYY-MM-DD", 7) %>
This inserts the date exactly 7 days from today. - Note Title & Path:
markdown
<% tp.file.title %>
This inserts the actual title of the newly created note, which Templater can help rename dynamically.
The more you dive into Templater, the more you'll appreciate its depth. It's the scripting engine that allows your templates to feel less like forms and more like intelligent assistants.
The Secret Sauce: Mastering Note Properties (YAML Frontmatter)
Beneath the surface of your notes lies a powerful system for organization and retrieval: Note Properties, also known as YAML frontmatter. These are structured metadata fields placed at the very top of your note, enclosed by three dashes (---) at the beginning and end.
yaml
type: meeting
date: 2025-09-07
attendees: ["John Doe", "Jane Smith"]
tags: [team, weekly-sync]
related-project: "Project X Launch"
Weekly Team Sync
...
What Are Note Properties?
Properties are key-value pairs (key: value) that describe your note. They're critical for:
- Organization: Categorizing notes (e.g.,
type: project,type: article). - Search & Filtering: Quickly finding all notes with a specific
status: in-progress. - Powerful Queries: Plugins like Dataview can use these properties to build dynamic tables, lists, and dashboards (e.g., "Show me all active projects with a due date in the next week").
Connecting Your Knowledge: Linked Properties
One of the most potent uses of note properties is creating explicit relationships between notes. By linking one note to another within a property, you establish a strong, machine-readable connection. You do this by wrapping the link in double quotes:
yaml
type: meeting
project: "[[Project Alpha Q3]]"
This project: "[[Project Alpha Q3]]" property explicitly states that this meeting note is related to "Project Alpha Q3." This relationship is:
- Visible in Backlinks: "Project Alpha Q3" will show this meeting note in its backlinks pane.
- Queryable by Plugins: Dataview can easily show all meetings related to "Project Alpha Q3."
- Graphable: The connection strengthens your knowledge graph.
Automating Properties with Templates
This is where templates truly shine. Instead of manually typing out these properties for every new note, your templates can pre-fill them, often dynamically using Templater.
For example, a project template might automatically include:
yaml
type: project
status: pending
created: <% tp.date.now("YYYY-MM-DD") %>
owner: <% tp.system.prompt("Project Owner") %>
This ensures every new project note immediately has a type, status, creation date, and prompts you for the owner, making your vault consistently structured and instantly searchable from day one.
Putting It Into Practice: Automated Meeting Notes with Templater
Let's walk through a concrete example: creating consistently named, organized meeting notes using Templater.
Defining Your Goal: Consistent, Organized Meeting Records
We want to achieve two things:
- Consistent Naming: Every meeting note should follow a predictable pattern, like
Weekly Team Sync @ 2025-09-07.md. - Organized Filing: Notes for a specific meeting series should live within their own sub-folder (e.g.,
Meetings/Weekly Team Sync/).
Step-by-Step Template Creation
- Create your Template File:
In your designatedTemplates/folder, create a new file. Let's call itNew Meeting Note.md. - Add Templater Content:
PopulateNew Meeting Note.mdwith the following:
markdown
type: meeting
date: <% tp.date.now("YYYY-MM-DD") %>
attendees:
project:
tags:
<% tp.system.prompt("Meeting Title", tp.file.title) %>
Attendees
Agenda
Discussion
Action Items
- [ ]
Metadata
- Date: [[<% tp.date.now("YYYY-MM-DD") %>]]
- Time: <% tp.date.now("HH:mm") %>
- Location:
Explanation of Templater magic: date: <% tp.date.now("YYYY-MM-DD") %>: Automatically pre-fills thedateproperty with today's date.# <% tp.system.prompt("Meeting Title", tp.file.title) %>: This is powerful. It prompts you for the meeting title. Crucially, the second argument (tp.file.title) tells Templater to use this input to rename the file itself.[[<% tp.date.now("YYYY-MM-DD") %>]]: Creates an internal link to today's daily note or a date-specific note.
- Refine the File Renaming (Optional, but powerful):
If you want the file to be renamed even more specifically (e.g.,Meeting Title @ YYYY-MM-DD.md), you'd modify the prompt and add more logic within the template or Templater's file naming options. For example, in Templater's settings, you can define a "New file name format" that uses Templater functions. A simpler approach for the meeting title example is:
markdown
type: meeting
date: <% tp.date.now("YYYY-MM-DD") %>
attendees:
project:
tags:
<%*
let title = await tp.system.prompt("Meeting Title");
let folder = tp.file.folder(true); // Get current folder path
let newFileName = title + " @ " + tp.date.now("YYYY-MM-DD");
await tp.file.rename(newFileName);
-%>
<%* tR += title %>
Attendees
Agenda
Discussion
Action Items
- [ ]
Metadata
- Date: [[<% tp.date.now("YYYY-MM-DD") %>]]
- Time: <% tp.date.now("HH:mm") %>
- Location:
This snippet uses a Templater code block (<%* ... %>) to first ask for the title, then construct a new file name, and finally rename the current file. ThetR += titlesimply inserts the captured title into the note content.
Making it Easy: Folder-Specific Triggers
Now, how do you make this New Meeting Note template appear when you want it?
If you want to create a meeting note specifically for "Weekly Team Sync" in the Meetings/Weekly Team Sync/ folder:
- Right-click on the
Meetingsfolder (orMeetings/Weekly Team Syncif you have it created already). - Choose "New file with template" (this option appears thanks to Templater).
- Select your
New Meeting Note.mdtemplate.
Templater will:
- Create a new file in that folder.
- Run the template, prompt you for the "Meeting Title."
- Rename the note based on your input (e.g.,
Weekly Team Sync @ 2025-09-07.md). - Pre-fill all the YAML properties and note content.
This workflow saves immense time and ensures every meeting note is perfectly structured and filed where it belongs.
Simplified Automation: The "Auto Template Trigger" Plugin
Sometimes, you don't need the full power of Templater's JavaScript engine; you just want a specific template to apply automatically to notes created in certain folders, or to be prompted to pick one. That's where the "Auto Template Trigger" community plugin comes in.
This plugin is designed to be lightweight, quick, and simple, providing automatic template application without the extensive functionalities of Templater.
When You Need Less Power, More Simplicity
"Auto Template Trigger" is ideal for:
- Ensuring every note created in your
Journal/folder uses yourDaily Entry.mdtemplate without any prompting. - Prompting you to choose between a
Meeting NoteorProject Updatetemplate whenever you create a new file in yourWork/folder. - New users or vaults where the complexity of Templater might be overkill for basic needs.
It doesn't run JavaScript within the templates themselves, nor does it dynamically rename files based on template content. It simply applies a pre-existing template. The template it applies can be an Obsidian core template or a Templater template (which will then run its own dynamic logic after being applied).
How it Differs from Templater
- Templater's Power: Executes JavaScript within the template, can rename files, prompt for specific variables, and interact with the vault in complex ways.
- Auto Template Trigger's Simplicity: Triggers the application of a chosen template (which can then run its own Templater logic if it's a Templater template). Its primary function is when and which template gets applied, not what the template does internally.
Setting Up Automatic Template Application
- Install and Activate: Find "Auto Template Trigger" in Settings > Community plugins > Browse and enable it.
- Configure in Settings: Go to its settings pane.
- Default Prompt: By default, "Auto Template Trigger" will prompt you to select a template every time you create a new file anywhere in your vault. This is great if you always want to choose.
- Folder-Specific Assignment: The real power lies in assigning templates to folders:
- Click "Add folder override."
- Select a folder (e.g.,
Journal/). - Select a template (e.g.,
Templates/Daily Entry.md). - Now, any new file created directly in
Journal/will automatically useDaily Entry.mdwithout prompting.
You can set up multiple folder overrides for different parts of your vault, creating a seamless, automated experience for note creation without having to remember to manually insert templates.
Troubleshooting Your Templates: When Things Go Wrong
Even the best-laid automation plans can hit a snag. A misspelled variable, a syntax error, or a logical flaw can cause your Templater templates to misbehave. Don't panic; debugging is a standard part of the process.
Your Best Friend: The Developer Console
Obsidian is built on Electron, which means it's essentially a web browser application. This gives you access to a powerful tool: the Developer Console.
To open it:
- Windows/Linux: Press
Ctrl + Shift + I - macOS: Press
Cmd + Option + I
Once open, navigate to the "Console" tab.
Common Pitfalls and Quick Fixes
When a Templater template fails, the Developer Console is usually where you'll find the answers. Look for:
- Red Error Messages: These are your primary clues.
- File and Line Number: Errors often specify which template file and which line number the problem occurred on. This is invaluable for pinpointing the exact location of the issue.
- Error Type:
TypeError: Often means you're trying to perform an operation on a variable that isn't the expected type (e.g., trying to call a function onnullorundefined).SyntaxError: Indicates a problem with the structure of your JavaScript code (e.g., missing a parenthesis, a comma, or a curly brace).ReferenceError: Means you're trying to use a variable or function that hasn't been defined or is out of scope.
Debugging Workflow:
- Open the Console: Before attempting to trigger your template.
- Trigger the Template: Create a new note and apply the template.
- Check the Console: Look for red errors.
- Read the Error: Understand the file, line, and type of error.
- Fix and Retry: Make the necessary correction in your template file and try again.
For Templater specifically, ensure you're using thetp.prefix for all Templater functions (e.g.,tp.system.prompt,tp.file.title). Forgettingtp.is a commonReferenceError.
Building Your Automated Knowledge System: Best Practices
Leveraging Obsidian's core features for template automation isn't just about individual tricks; it's about building a cohesive, efficient knowledge system. Here are some best practices to guide you:
Start Simple, Then Scale
Don't try to automate everything at once. Begin with a single, repetitive task – like daily notes or meeting agendas. Master the basic Obsidian Templates, then gradually introduce Templater's power. Each successful automation will build your confidence and understanding, allowing you to tackle more complex workflows.
Organize Your Template Folder
As your template collection grows, keep your Templates/ folder tidy.
- Subfolders: Create subfolders like
Templates/Daily,Templates/Meetings,Templates/Projects. - Clear Names: Use descriptive names for your template files (e.g.,
Project Proposal Template.md,Weekly Review.md). - Documentation: Add comments within your templates (using HTML comments `` or JavaScript comments
// comment) to explain complex logic or placeholders.
Review and Refine Regularly
Your workflow and needs evolve. What was a perfect template six months ago might be clunky today. Periodically review your most used templates:
- Are they still saving you time?
- Are there new properties you should be adding?
- Can you simplify any parts, or make them more robust with new Templater features?
- Check for any errors that might have crept in, perhaps due to Obsidian or plugin updates.
Your Next Step Towards an Automated Vault
You've now seen the incredible potential of leveraging Obsidian's core features for template automation. From the humble simplicity of Obsidian's built-in Templates plugin to the dynamic prowess of Templater, and the structural integrity offered by Note Properties, you have a powerful toolkit at your disposal. Adding the "Auto Template Trigger" plugin can further streamline your initiation of these powerful workflows.
The journey to an automated Obsidian vault is iterative. Start with one template, get comfortable, and then expand. Each step you take will not only save you precious time but also build a more consistent, connected, and ultimately more intelligent personal knowledge management system. Stop the manual grind and start building a vault that works for you. Your future self will thank you.